Visualizzazione post con etichetta remote shooter. Mostra tutti i post

sabato 23 novembre 2013

Un Mercoledi da Maker


Tratto da : http://openmag.it/2013/11/21/popupmakers-si-presenta-al-roma-makers-fablab/

Si è svolto il 20 novembre il primo appuntamento con i PopUpMakers presso il Roma Makers Fablab.

Il PopUpMakers è un vero Mercoledi da Makers, in cui gli artigiani del futuro possono presentare i loro progetti.

PopUpMakers è un evento mensile per accelerare connessioni e collaborazioni locali nel movimento dei Makers. I protagonisti raccontano un loro progetto attraverso parole e immagini ma soprattutto un prototipo da mostrare. 15 minuti per condividere l’idea, il processo di creazione, gli intoppi e le scoperte del work-in-progress.
L’evento, che è stato presentato da Alessio Nisi, noto giornalista di CheFuturo! e Startup Italia, ha visto come protagonisti Gian Luigi Perrella e Agostino Mosillo che hanno presentato Remote Shooter BT per controllare da uno smartphone o un pc (via Bluetooth) una macchina fotografica digitale, dallo scatto a funzioni di Time Lapse, velocità e apertura diaframmi o scatto scatenato da eventi esterni. Un secondo progetto presentato  Spazio è stato dato anche all’azienda Blu Sistemi che ha presentato Smartize.it! , ovvero un sistema di domotica open source modulare e a basso costo, per risolvere in modo smart i piccoli e grandi problemi di automazione della vita quotidiana.
Il Roma Makers Fablab è la prima realtà romana dedicata agli artigiani digitali, le iniziative sono volte a promuovere la conoscenza e cultura dei makers, ma soprattutto fornire risposte reali e concrete nei confronti del territorio. Come ha sottolineato Stefano Varano, uno dei responsabili del centro, le attività vengono organizzate anche secondo le esigenze degli utenti, come ad esempio l’opportunità che si sta offrendo a un gruppo di giovani ragazze le quali potranno usufruire di alcuni macchine da cucine, per potersi dedicare alle loro attività laboratoriali.

https://www.youtube.com/watch?v=DjlDg1_eGoM

lunedì 18 novembre 2013

POPUP MAKERS 20 Novembre


Popup Makers del 20 novembre

Popup Makers

“Think with your hands, build something or try something,then talk about it, NOT the reverse.”
Perry Kleban

“Crea più valore di quello che puoi utilizzare”
Tim O’Reilly


20 novembre 2013 dalle 20 alle 22
@Roma Makers Fablab
(zona Metro Garbatella, Italo)

PRESENTAZIONI

Per la seconda volta si svolge al Roma Makers Fablab, all’interno del Mercoledi da Makers, istituito come appuntamento settimanale dei makers romani per portare avanti i propri progetti.

Gian Luigi Perrella e Agostino Mosillo presentano Remote Shooter BT
Controllare da uno smartphone o un PC (via Bluetooth) una macchina fotografica digitale, dallo scatto a funzioni di Time Lapse, velocità e apertura diaframmi o scatto scatenato da eventi esterni.

Blu Sistemi presenta Smartize.it!
Domotica open source modulare e a basso costo, per risolvere in modo smart i piccoli e grandi problemi di automazione della vita quotidiana.

L’evento sarà presentato da Alessio Nisi, blogger e giornalista per Startup Italia e CheFuturo.


giovedì 29 marzo 2012

Remote Shooter 1.0: USB remote control system for cameras


 Modern digital cameras not only use the USB port to transfer images to PC (USB Mass Storage), but also to receive specific control commands that control certain functions (USB PTP). 
 Based on the prototype presented on http://glptech.blogspot.it/2011/12/controlling-digital-camera-via-usb-port.html
 Remote Shooter 1.0 is the complete solution for remote control shooting with Time Lapse functions and events.
Many models of compact and DSLR cameras, Nikon and Canon in particular, are compatible with the USB PIC-AP-BOARD (PIC Auto Programming Board) and the firmware RemShoot 1.0 (Remote Shooter)
 The ability to remotely activate many functions (but especially the shot) on digital cameras give the opportunity of take pictures that sometimes  is manually impossible or at least difficult to achieve with the traditional method because of human reaction times.

NEW:
 tested on:
Nikon Coolpix AW100
Nikon D50
Canon Powershot A300
Canon Poweshot S500

 PTP and applications in photography. 
The PTP commands more interesting to implement for the photo enthusiast are: 
1) Remoting the shutter button (shutter),

2) Interval (Time Lapse) 

3) Set / read values ​​of shutter speed, aperture, etc..

4) Shutter controlled by light sensors and sound reacting to external events
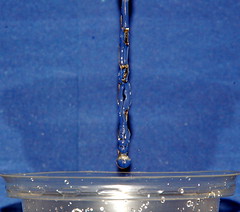
 Making jerky in the world of high speed photography (a falling drop of water or other liquid, explosion of balloons etc) or take shots at regular intervals (even hours) while Time Lapse (eg to record the blossoming of a flower or the hatching of an egg) is easily achieved by combining this system with appropriate sensors, motion, light or sound. 

5) Bracketing (for cameras that provide the function) to make postelaborazioni in HDR. For those not aware, the bracketing feature (usually found on DSLR) cameras in the shows "varied exposure to fork", this includes the performance of at least 3 photos in succession separated by a value of over-and underexposure (longer and shorter than expected) that allows you to "hit" the perfect photo or obtain special software with a special effect (HDR, High Dynamic Range) superimposing the three images. 

The firmware Remshoot 1.0
RemShoot 1.0 handles the shooting of pictures  simultaneously in two different ways:
    1) Through PTP, using the camera's USB connection and remotely shooting.
    2) Using a command pin to safety trigger an external flash. (recommended use of the camera in bulb mode and in darkened environment)

For shots in high speed, as fast, the USB protocol in some cases may not be qualified.
The functions currently available are:
    1) Remoting the shutter button (shutter),

Warning: the remote cord used is that provided for the Generic PTP, used by most compact and DSLR cameras that claim to support the PTP protocol and remote control.

    2) Interval (Time Lapse)
        parameters:

     firing frequency, in seconds
     number of shots

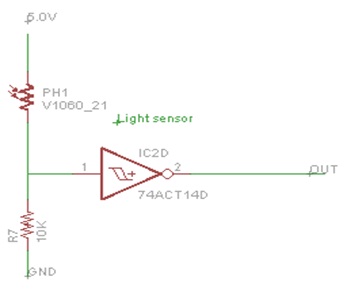
    3) Shutter controlled by light sensors and sound reacting to external events.
        parameters:

     sensor enabled / disabled
     delay in microseconds (necessary in order to synchronize the best shooting with the position of the moving object intercepted by the sensor used)


Compatibility 
To check if your camera can be controlled by RemShoot 1.0 is recommended that you download the application compatibility testing for Windows (XP and Seven):   http://goo.gl/2BVMg

        Fast link
http://goo.gl/2BVMg


Once you have downloaded it,  extract the files, connect your camera to a USB port of your PC (make sure to set PTP mode, NOT Mass Storage Mode), PTPControlCheck.exe run the executable and follow the instructions.

USB PTP 1.0 P&M Lab 2012
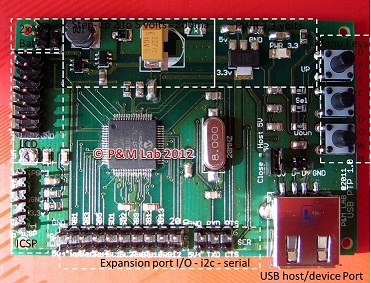
The USB PIC-AP-board ready for use, programmed with the firmware RemShoot 1.0.


The philosophy that inspired the PIC-AP-BOARD project:

Invent
: Create your own project

Develop
: Develop and test on-board PIC-AP Board

Use
: complete it and use the same board PIC-AP-Board for your target project.


After several years of testing on development boards more or less evolved (from Microchip products Pic18 to PIC32), we realized that we needed a board of our own and be more self-sufficient as possible, easily powered, equipped with lcd display and keys, and the right number of pin I / O available, first of all capable of selfprogramming without use of external programmers, on which to develop a project more or less complex, which once consolidated revolved on the same board without other passages, but whose firmware be easily updated by anyone.

 
Using the USB PIC-AP-board for various uses

The USB PIC-AP-Board even if they already came with firmware 1.0 RemShoot for controlling a digital camera, can, thanks to its power to function (USB, I2C, SPI, ADC, Timers, PWM, UART, etc.), memory and expandability to be used for purposes other than photography.
The fact sheet can be connected via USB to a PC is powered by independent power supplied from the PC (USB device self-powered or bus powered) thus allowing a wide variety of uses, of course with the right firmware that can be modified by the particular USB boot loader used for updating, thus allowing you to program the card with a simple USB stick with no specific type of programmer for PIC, in each case by the most experienced programmers can also be programmed via ICSP.

To show the great  flexibility of the board we are working to complete other projects that we'll publish for fans of Electronica Open Source Blog, dedicated to the use of graphic displays, or even to connect wireless or wired with PC and Smartphone devices and Android in general, using different categories of sensors or the ability to control external equipment.


Technical specification of USB PIC-AP-BOARD

Schema a blocchi

USB PIC-AP-BOARD : Functional blocks.


The board is built in large part to make it compact SMD (5x7 cm) and easily portable, in addition to the LCD, need to work only 2 AA batteries 1.5 V AA

USB PIC-AP-BOARD
Microcontroller: PIC24FJ256GB106

      1x USB Host / Device (Bus Powered or Self-Powered)
      1x USB MODE jumper
      1x 14-pin LCD connector
      1x 8x2 LCD DISPLAY
      3x Buttons
      16 Input / Output pins and power (5V and 3.3V)
      2x I2C port
      1x serial port
      1x Power LED
      1x ICSP connector for Debug / Program
      Power: 3V with 2 AA batteries 1.5 V
 
The DC-DC converter provides high efficiency at 3.3V and 5V voltages required to power the card, USB devices and any external circuits connected to the expansion connectors

The kit RemShoot 1.0

 For those interested in the solution and tested, ready for use, the kit consists of:

1) Card 1x USB PIC-AP-board mounted, tested and loaded firmware RemShoot1.0 (upgradable)

2) 1x LCD 8x2

3) User Manual supplied with the wiring diagram and pin configuration of port expansion

4) File Gerber board design USB PIC-AP-BOARD

5) File. Hex bootloader USB Adapter-specific for USB PIC-AP-BOARD

6) File. Hex firmware 1.0 RemShoot

Remarkable that with its  USB Host
bootloader, the board can be reprogrammed or updated all through a simple USB key dongle without using any kind of programmers.

For projects we recommend the use of tools like Microchip MPLAB and Microchip C30 compiler, you compile the project, copy the file. Hex on the USB stick once connected to the
PIC-AP-BOARD, program itself in seconds.
Example of a light detector joint with a laser beam


 Shoots remotely controlled by a laser beam


A shoot remotely controlled by a sound trigger


Read more on EMCelettronica Open Source(sorry, is in Italian)

For electronics enthusiasts and DIY Remote Shooter, the project documentation is available at only 9 euros. You can make it yourself (do-it-yourself) by downloading the documentation (schematic, wiring diagram, parts list, assembly plan, gerber files, executable code) from the site  EMCelettronica Open Source.   Download

If you are interested in Remote Shooter assembled and tested, with LCD display, you can find it on Ebay Italy


For every doubt contact me at gianluigi.perrella@gmail.com

mercoledì 21 marzo 2012

Remote Shooter 1.0: sistema di controllo remoto USB per macchine fotografiche


Da diverso tempo le moderne fotocamere digitali possono utilizzare la porta USB non solo per trasferire immagini al PC (USB Mass Storage) , ma anche per ricevere specifici comandi di controllo che ne controllano alcune funzioni (USB PTP). Remote Shooter 1.0 è la soluzione completa per il controllo remoto dello scatto con funzioni di Time Lapse e ad eventi
Molti modelli di compatte e  DSLR, Nikon e Canon in particolare, sono compatibili con la scheda USB PIC-AP-BOARD (PIC Auto Programming Board) ed il firmware RemShoot 1.0 (Remote Shooter)
La possibilità di attivare remotamente molte funzioni (ma in particolare lo scatto) sulle macchine fotografiche digitali rende possibile realizzare fotografie a volte impossibili o almeno difficili da realizzare con il metodo tradizionale a causa dei tempi di reazione umani.

Protocollo PTP e applicazioni nella fotografia.
I  comandi PTP piu’ interessanti da implementare per l’appassionato di fotografia sono:
1) Remotizzazione del pulsante di scatto (shutter),
2) Intervallometro (Time Lapse)
3) Impostazione/lettura dei valori tempi di scatto, apertura diaframma etc.
4) Scatto comandato da sensori di luce e suono in base ad eventi esterni
Fare scatti nel mondo della fotografia ad alta velocita’ (caduta di una goccia d’acqua o altro liquido, esplosioni di palloncini etc) o fare scatti a intervalli regolari (anche di molte ore) con la funzione Time Lapse (ad esempio per registrare lo sbocciare di un fiore o lo schiudersi di un uovo) e’ facilmente realizzabile abbinando a questo sistema opportuni sensori di movimento, luce o suono.
5) Bracketing (per le fotocamere che ne prevedono la funzione) per effettuare postelaborazioni in tecnica HDR. Per chi non fosse a conoscenza, la funzione Bracketing (in genere si trova sulle DSLR) nelle macchine fotografiche indica la "esposizione variata a forcella", questa prevede l'esecuzione di almeno 3 foto in successione separate tra loro da un valore di sovra e sottoesposizione (tempo più lungo e più corto del previsto) che permette di "centrare" la foto perfetta o di ottenere con speciali software un effetto particolare (HDR, High Dynamic Range) sovrapponendo le tre foto.

NEW:
 tested on:
Nikon Coolpix AW100
Nikon D50
Canon Powershot A300
Canon Poweshot S500

Per verificare se la tua fotocamera può essere controllata da RemShoot 1.0 si consiglia di eseguire il test di compatibilità scaricando l’applicazione per windows (XP e Seven):

http://goo.gl/2BVMg

Una volta effettuato il download estraete il file, collegate la vostra macchina fotografica ad una porta USB del vostro PC, (assicuratevi di impostare PTP Mode e non Mass Storage), lanciate l’eseguibile PTPControlCheck.exe e seguite le istruzioni.

La scheda USB PIC-AP-BOARD pronta all'uso, corredata del firmware RemShoot 1.0
USB PTP 1.0 P&M Lab 2012


La filosofia con la quale nasce la PIC-AP-BOARD:

Invent:  Crea il tuo progetto
Develop: Sviluppalo e testalo sulla scheda PIC-AP-BOARD
Use: Completalo e usa la stessa scheda PIC-AP-BOARD per il tuo progetto finito.

Se ti interessa Remote Shooter montato e collaudato, completo di display, puoi trovarlo su Ebay Italia

Leggi tutto su EMCelettronica Open Source